|
|
A Quick Walk-through
|
& Barnaby Wasson |
This write-up is a quick walk-through of building a relational database using FileMaker Pro. It is composed of two parts: the conceptual section and the procedural section. If you cannot fully understand the concepts, go ahead and walk through the procedure as doing is an effective way of learning.
Conceptual
Why relational?In the past, data were stored as flat files, which meant there was no partition of data. For example, if you have a system storing student information, the database may contain 400 fields, including name, address, phone, GPA, enrolled classes, financial aid info...etc for each individual record. This approach is impractical and inefficient.
First, the system designer must foresee every possible bit of information to be used and incorporate all of them into one giant database. Second, there will be many duplications of data. If a student enrolls for six semester, he will have six records. All information about him across all these records are the same except the enrollment information. Not only does the giant database file wastes a lot of disk space, but also slows down all data processing.
Relational databbase systems (RDBS) remediate the preceding shortcomings. The idea of RDBS is very simple: Partition databases at the design stage and join them by forming relationships. There is no need to predict every future need for new database can be created and join the existing system later.
ER/ Diagram
Since paritioning requires careful planning, you should draw an Entity/Relationship diagram (ERD) to visualize the file structure. You can draw the diagram using penicl and paper or any charting software program.
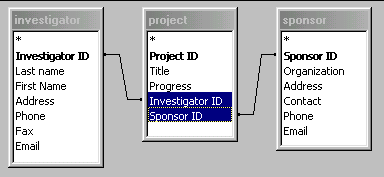
Let's use a new example to explain partitioning further. You want to build a database to keep track of project progress in your school. You want to include the project's info, the principal investigator's info, as well as the project sponsor's info. Before you create all these fields into the project database, think about how many redundant data the file will have. The same person may be in charge of more than one project and the same organization may also sponsor several projects.
Therefore, it is wiser to "divide and conquer." Investigator's info and sponsor's info should be kept as two separate entities. In order to make their data usable in the project database, unique keys should be defined so that meaningful relationships among the three entities can be established.
In this example, Investigator ID and Sponsor ID are used as unique keys in the investigator and sponsor databases, respectively. In the project database, these ID are not unique because as mentioned before, the same investigator may participate in many activities and the same sponsor may also support several projects. Thus, another unique key, Project ID, is created for the project database.
The process of removing data redundancy by creating separate entities and creating unique keys for establishing relationships is called normalization.
Types of relationship
There are three types of relationships in RDBS: One-to-one, one-to-many, and many-to-many. When every record in File A matches only one record in File B, this is called one-to-one relationship. When every record in File A may match one or many records in File B, this is called one-to-many relationship. When multiple records in File A have relationships with multiple records in File B, it is called many-to-many relationship. Many-to-many relationship is too complicated and should not be avoided. These relationships are further elaborated with the following metaphors:
A one-to-one relationship might be better explained with an example of couple. Consider a legal marriage. A woman could be married to no one or a single man. A man could be married to no one or a single woman. Either way, when they are married it is to one and only one other person of the opposite sex.
A one-to-many relationship could also be better explained with an example. Consider traditional fatherhood. A father may have no kids, one kid or many kids but each of these kids will only have him as their father.
A many-to-many relationship could also benefit from the use of an example. Consider the lending history of library books. A person can borrow from the library no books, one book or many books in their life time. A book can be lent out to no persons, one person or many persons in its lifetime.
A one-to-one relationship are usually rare. Most of the time when you think you have a one-to-one relationship, you actually have a one-to-many relationship where the many is currently one. One-to-many relationships are as common as Many-to-many relationships and avoid many of the problems associated with the many-to-many relationship.
RDBS were not designed to work with many-to-many relationships due to their indefinable relationship nature. When you come across a relationship of this type, you need to develop a new relational database, a composite entity, between the many-to-many entities that maintains a one-to-many relationship to each of them. Again, RDBS were designed to work with one-to-one and one-to-many relationships, not many-to-many.
In the preceding example, investigator-to-project and sponsor-to-project are both one-to-many relationships.


Procedures
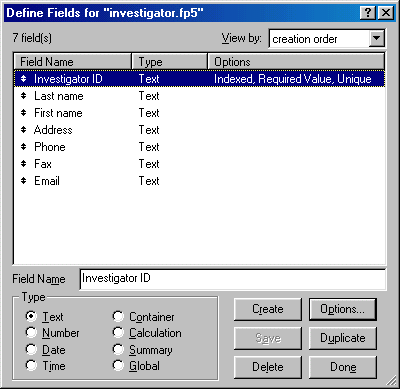
Now let's put theory into practice. First, create the Investigator database and define new fields as shown below.
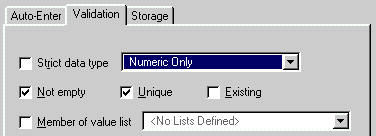
As mentioned before, the Investigator ID will be used as the unique key for matching records in another database, therefore additional properties must be define for that field. Highlight Investigator ID and double click the field to reveal more options. Choose the Validation tab and check Not empty and Unique. If the ID value is missing or two persons use the same ID, the relational databases will fail to join data in two more more places.
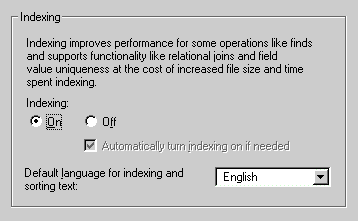
Next, choose the Storage tab and turn on Indexing. If the field is pre-indexed, the performance will be improved. The default setting of FMP is index off. You may wonder why FMP doesn't automatically index every field. It is because indices occupy more storage space on the hard drive. Unless you have plenty of hard disk space, you should not index every field. Since the key is unique and is used for joining databases, the Investigator ID will be used very often in searching and sorting and thus it should be indexed.
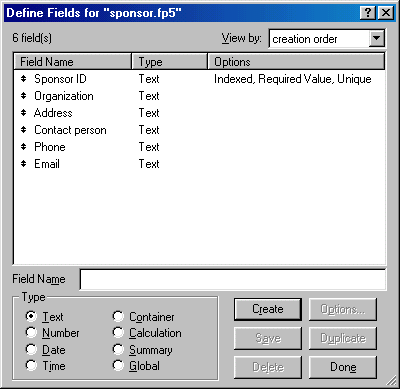
Next, create the Sponsor database and define the following fields. Make sure to define the Sponsor ID as the key and index the field, as was previously done with the Investigator ID.
Last, create the Project database and define the following fields: Project ID, Title, Progress, Investigator ID, Last name, first name, Address, Phone, Fax, Email, Sponsor ID, Organization ID, Sponsor address, Contact person, Sponsor phone, and Sponsor Email. Make all of them as text fields temporarily. You will change the nature of some of the the fields later. Again, assign Not empty, Unique, Index to the Project ID's properties.
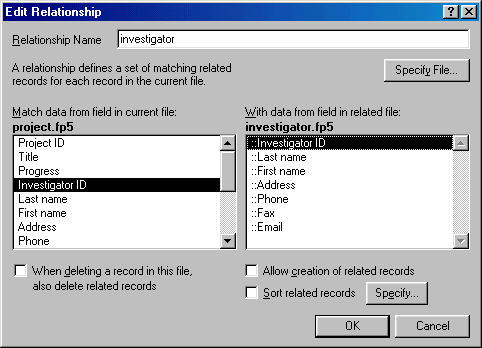
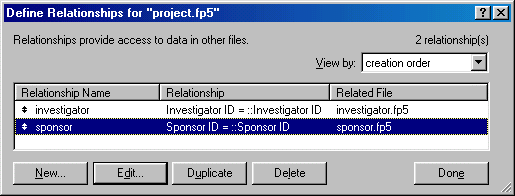
Choose Define Relationships from the File menu. Click New to define a new relationship. Locate the Investigator database so that its fields and the Project's fields are side by side in two windows. Click Investigator ID in both windows, then click OK.
Repeat the same procedure to form a relationship with the Sponsor database. The Project database should have two relationships now.
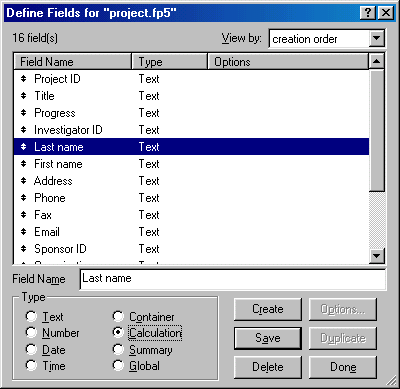
Now change the data-type of Last Name to Calculation field. Choose Define Fields from the File menu to bring up the list of fields for the Project database. Highlight the field Last Name, check Calculation in Type, then click Save.
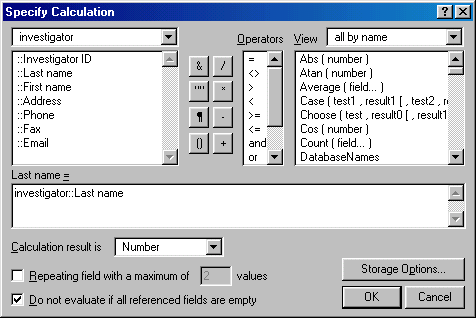
A dialog box will ask you whether you want to proceed or not. Click OK to proceed. Another dialog box will ask you to specify the calculation. From the upper left pull down menu, select Investigator. The fields in the Investigator database will be listed in the box below the pull down menu. Choose Last name. Then click OK.
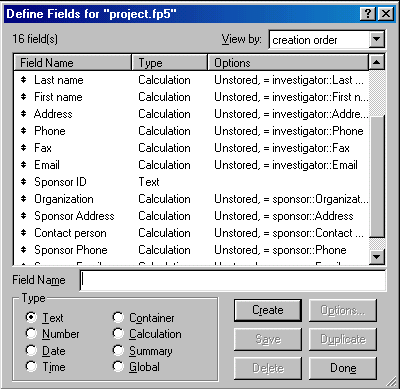
Repeat the same procedure for First name, Address, Phone, Fax, and Email. Next, link the fields Organization, Sponsor address, contact person, Sponsor phone, and Sponsor email to the corresponding fields in the Sponsor database. When you are done, the field definition should look like the following:
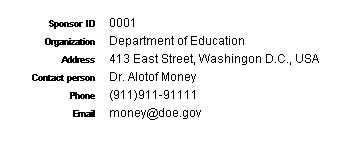
Now these relationship databases are ready to go. Try this: Enter the following data in the Investigator and the Sponsor databases, respectively.
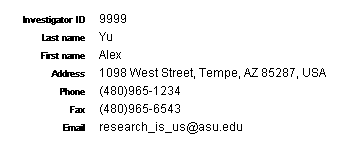
Leave the above two databases open. Switch to the Project database and start entering data. Please note that only text fields are editable. In the investigator ID field, enter "9999." In the Sponsor ID field, enter "0001." What happens?
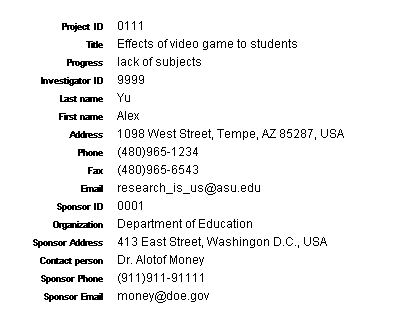
If everything is done correctly, all those non-editable fields should pull data from the two linked databases, as shown in the following:
Now go back to either the Investigator database or the Sponsor database and make changes to the data. Afterwards, switch back to the Project database. The changes should also be updated in Project.

Navigation
FMP Tips Contents
|
 |